
Welcome to Kenyan Media. We hope that you will enjoy all our services here.
Kenyan Media brings you all you need in terms of Camera coverage and shooting as well as editing the raw footage to the final product.
Camera coverage, in video making and video production, is the amount of footage shot and different camera angles used to capture a scene. When in the post production process, the more camera coverage means that there is more footage for the video editor to work with in assembling the final cut.
We cover different types of functions like weddings, pre-wedding parties, birthdays, state functions, conferences, retreats, music songs, corporate functions, Tv commercials, dramas and many more.
Kenyan Media is also here to market your products and brands. If you have been looking for a place to advertise your products then you need not look any further. Kenyan media is the perfect place for all your products, try us and get the best results!
Creating Your Personal Tabletop Studio
The practice of tabletop photography can start with a sheet of paper, some cardboard and window light. But soon you’ll want more control in your own little studio. To help, we’ve looked at some alternatives for you.

This strange looking contraption is the tabletop studio I use to photograph small objects at home.
Photographing small objects at home can be both fun and technically challenging, and a good investment of time. It is an ideal pastime when the weather is not inviting you to go out and you still feel the need to photograph something. And it can also become a passion itself, a live and continuous lesson about the use of light.
You may have a collection of miniatures you want to photograph, or maybe you brought some pebbles from a last trip to the seashore and want to create some images with them. Whatever your needs in photographic terms, the obvious and best path is usually to create a small table top studio at home, using a table as the center of your new working area.
If you’ve a spare table that you can keep using all the time, then you’ll have the best solution in the world. Also, if possible, a table that has enough space so you can keep your gear and other materials close by. Don’t forget to consider light. You may need to place your table near a window if you’re not savvy with strobes.

The absolute control you can have over light. Even placing it under the subject (a tomato in this case), gives some interesting lighting.
Believe me, it is rather simple to photograph small objects in such a setting. This said, many of the pictures I see on the web, mostly from people trying to sell stuff, are not very inspiring and do not make you want to buy whatever they’re selling.
The excuse usually given is that they only have a compact camera. This doesn’t really matter because these days you can do some fantastic imagery with any camera if you know how to use it and pay some attention to the way you setup your tabletop studio.
Start With a Single Sheet of Paper

A single sheet of white paper and some foam core over a table, close to a window, can be a starting point for your tabletop photography.
Furthermore, modern day compacts offer you not only good LCDs where you can compose the image, but also close up options that let you get macro images, something you can only do with a DSLR after buying a lens that costs more than most compacts.
If you have a compact camera model that lets you control exposure, preferably in a full manual mode, you’ll be able to do tabletop photography at a superior level, believe me. Just remember that usually, with a compact camera, you’ll want to find the “no flash, thanks” mode, and it will work fine.
All you’ll need to start is a single piece of heavyweight paper (white, black or whatever colour you feel suitable) to use as the base and the light from a window (preferably passing through a white curtain or some other way of softening it). Reflectors, like foam core or sometimes aluminium foil or other reflective surface, will allow you control light on the darker side of the object.
I’ve done lots of images this way and it’s a good starting point to explore tabletop photography and see if you enjoy the activity. If you want to go further, then you can invest in a bit of DIY or Do It Yourself, and create a more sophisticated setting for your photography: a mini-studio in a box.
The Cardboard Box Studio
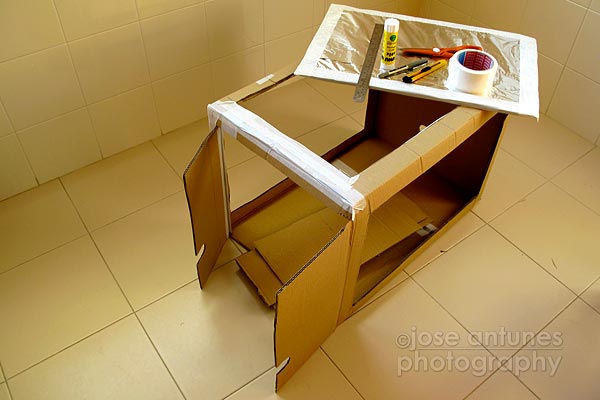
A cardboard box can be used as a DIY – Do It Yourself light tent for tabletop photography.
Get a cardboard box and open holes on the top and both sides, so you can let the light enter in your homemade light tent. You can use any semi-transparent white material for the windows (tracing paper or bed sheets are an example accessible to everyone, but you can go for more resistant materials). Glue or tape the diffusers in place.
Inside the box you’ll need a white sheet of heavyweight paper (to keep things simple, but you can change it for other colours for different results) that will be the base of your studio. Place it so it creates a ramp that mixes background and bottom, so you get a clean look in your images. You’re done.
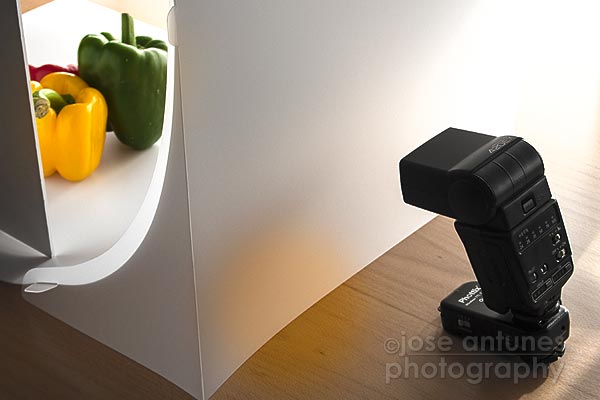
As mentioned previously, using the camera’s flash is a bad idea, so you have to think of alternatives. You’ll soon discover that even the light from the sun will do a great job providing a soft diffused source of light for any object you place in the light tent. The white surfaces reflect light around and create a good starting point to anything.
With a couple of desktop lamps you’ll be able to use your light tent even when the sun is not around. Watch for lamps that generate heat, and some of the modern day lamps that consume less energy offer a good solution for long hours of fun. Two desktop lamps, one for each side of the light tent, will give you enough light for most purposes.
Make Your First Reflectors

When starting out you do not need to get sophisticated lighting systems with umbrellas or softboxes.
Remember the pieces of cardboard left from the windows you’ve cut on the box? Cover them with aluminium foil or other reflective surface on one side and white on the other and you’ll have some extra reflectors to use in your studio, in case you need to control reflections inside it.
Also, think of making a pair of black surfaces to eliminate reflections. Because you’ve cut three pieces of the box, you can get 2x white, 2x silver and 2x black, enough to use in various situations if you use both sides of the cardboard.
If you have a camera that accepts the use of external flashes, then you’re ready for the next step in this adventure. Depending on your system you’ll be able to use cables, trigger flashes by IR or use a radio system.
Cables are great to start with but remember to buy them long enough for your needs. Infrared works fine as long as you do not start to slave flashes from the master unit. Popular opinion at the moment is that radio triggers are the best compromise between convenience and reliability.
After having used different systems, some homemade, for my table top photography, I’ve settled for a commercial system that suits all my needs. I always felt that light tents sold in the market are a bit claustrophobic for me. So when I found a system like the Modahaus Tabletop Studio I was hooked.
The Commercial Tabletop Studio

A Tabletop Studio and Steady Stand make a nice pair for tabletop photography.
These tabletop solutions come in different sizes, are flexible and versatile, allowing me to add and remove a light tunnel, (on the 216 model) or a light cone (on the 400 model) as required, giving me freedom of movement and unrestricted access to the objects I want to photograph.
I discovered the Modahaus system during a photography workshop I attended by photographer Don Giannatti. Afterwards when I visited the Modahaus website I thought a simple tabletop studio was all I wanted, But in the end I also bought a Steady Stand, because I can use it as an alternative “light tent” together with the Tabletop Studio, giving me more control over the light. It is not the ideal solution for all types of objects, but it doubles as a good system to use with small cameras and iPhones.

The Steady Stand works both as a light tent and also as a support for document and jewelry photography.
In fact, the Steady Stand, available in different sizes, was designed from the outset for iPhone 3GS, iPhone 4 and iPhone 4S, Androids, smartphones and most compact cameras. The Steady Stand provides, as Modahaus people state, “an elevated platform support for overhead product photos ensuring pin sharp, totally square-on, precisely composed, perfectly exposed photos and document copies.”
iPhoneography and Beyond

One earring and a watch from my collection photographed using the Steady Stand.
The clear translucent side walls soften and diffuse incoming light helping eliminate harsh shadows and provide clean uncluttered reflections on shiny subjects such as jewelry. The solution offers amazing results for small products, flat artwork, iPhoneography, photo based art and document capture.
As the watch photograph shows (I have a collection of watches and photographed them using the Steady Stand), it is a great solution. And it is also perfect to shoot necklaces, earrings and other small jewelry, for example, as you can hang them from the top and let them slide through the hole.

You have different backgrounds to choose and mix, and because they’re translucent you can use them with light behind, for special effects.
If you’re looking for a tabletop solution and want a ready-to-use option, take a look at all Modahaus products: portable tabletop studios and Steady Stands. I particularly like the tabletop studios, as they are flexible, sold with different colour backgrounds and come in a nice robust flat pack that is lightweight, easy to carry and assemble anywhere. All these products are made of an advanced polymer that is easy to clean, is wrinkle free and is better than a light tent or a cube.
Get Your Lights Under It
Being able to place a flash behind the background enhances the lighting options of the Tabletop Studio.
One of the things I like the most in terms of tabletop photography is to use lighting from under my subjects. I use a translucent sheet of acrylic under the table, supported on some boxes, in order to place a flash with a Rogue Flash Bender diffuser under it, and then add the other flash/flashes and eventually reflectors to create the mood I want. I can also place a flash behind the sweep background, for some special effects.
Since I bought the Tabletop Studio and Steady Stand, I’ve stopped using my other older solutions and rely on these “toys” for my tabletop photography. I very much like the results and the fact that I can easily take it anywhere and get my studio ready for a photo session in seconds.

Mixing the different colours on the background offers new creative options when photographing objects.
Last but not least, remember that you’ll need a tripod for most of this photography and some means of making the exposure without touching the camera – use the timer, a cable release or a radio trigger. And remember to check the white balance in your shots. Above all, have fun and create lots of photographs. Even if your first tabletop studio is just a piece of white cardboard and some white paper reflectors.
